Kubernetes Scheduler


How does Kubernetes schedule a pod on a node?- Using a kube-scheduler component.
Let's see how the scheduler schedules the pods in the cluster. The scheduler goes through all the pods and takes those pods which do not have the NodeName field. It then identifies the right node for a pod by running a scheduling algorithm and schedules the pod on a node by setting the NodeName property by creating a binding object.
Manual Scheduling
An answer to this is that in every pod manifest yaml file, there is a NodeName field, which is by default not set, but if you want, you can manually set NodeName for the pod at the time of pod creation but Kubernetes automatically set it for you.
But if you want to bind a node to an existing pod then create a binding object and send a post request to the pod binding API.
# Pod-binding object yaml file
apiVersion: v1
Kind: Binding
metadata:
  name: nginx
target:
  apiVersion: v1
  kind: Node
  Name: node02

# pod object creation yaml file
apiVersion: v1
Kind: Pod
metadata:
  name: nginx
  labels:
    name: nginx
spec:
  containers:
    - name: nginx
      image: nginx
      port:
        - containerPort: 8080

# send binding request to pod API using json data
curl --header "Content-Type:application/json" --request POST --data '{"apiVersion":"v1", "kind":"Binding", "metadata": ...}' http://$SERVER/api/v1/namespaces/default/pods/$PODNAME/binding/
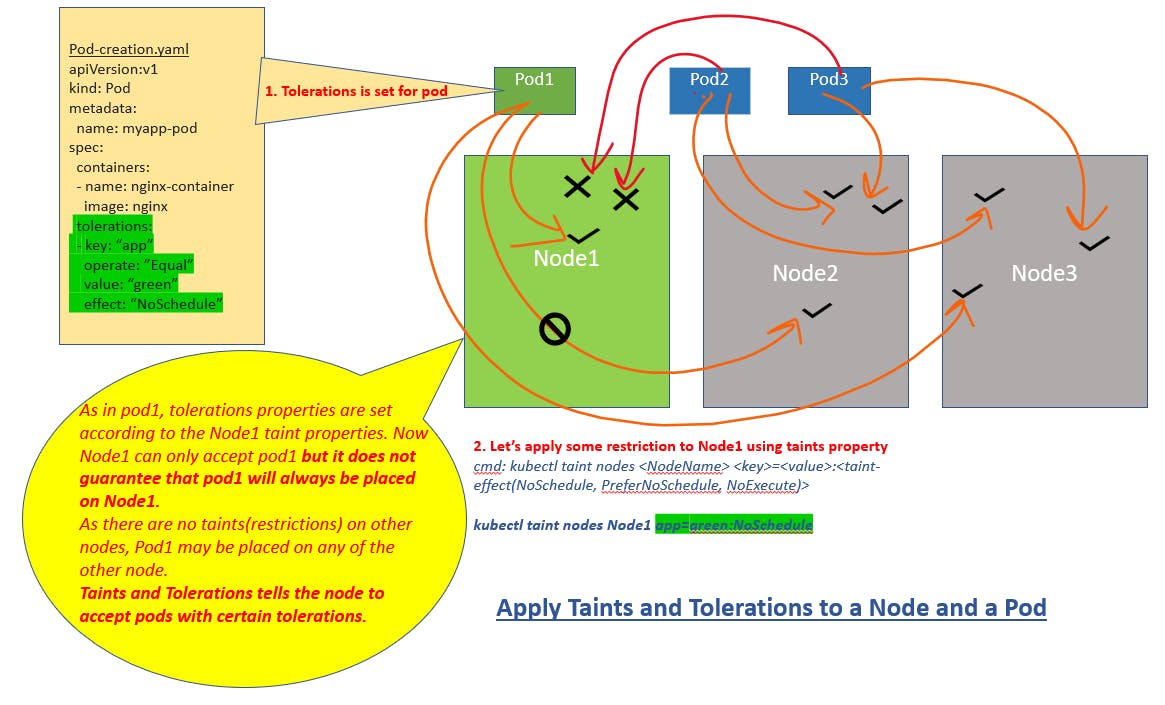
Taints and Tolerations
Mater is also a node then why does the scheduler not schedule any pod on the master node? That's because of Taints and Toleration mechanism.
# to see the taint used in master node with NoSchdule and this is how schedueler not able to schduele any pod on the master node.
kubectl describe node kubemaster | grep Taint
However, the best practice is not to deploy any pod on the master node.
What are Taints and Tolerances? How can you restrict what pods are placed on what nodes?
Taints and Tolerances are to restrict nodes from accepting certain pods. Taints are set on nodes and tolerances are set on pods.
Node Selector
Using the NodeSelctor property we can limit the pod deployment to a specific types of node.

For simple node selection for a pod, NodeSelctor does the job perfectly but if there are some complex conditions like pod should not deploy to a specific label of a node or having some more complex conditions. Then Node Affinity comes into the picture.
Node Affinity
It ensures pods are hosted on a specific node.
We see in previous examples that Node does not guarantee that pod will always deploy on that node, but this can be easily done with Node Selector. If there are some complex condition combinations of OR, AND, NOT then we will use Node Affinity. It provides us with advanced features to limit pod hosts on a specific node.
Suppose we want to place a pad on those nodes which have been labeled as Large or Medium and not Small.
apiVersion: v1
kind: Pod
metadata:
  name: with-node-affinity
spec:
  affinity:
    nodeAffinity:
      requiredDuringSchedulingIgnoredDuringExecution:
        nodeSelectorTerms:
        - matchExpressions:
          - key: size
            operator: In
            values:
            - Large
            - Medium
      preferredDuringSchedulingIgnoredDuringExecution:
      - weight: 1
        preference:
          matchExpressions:
          - key: size
            operator: NotIn
            values:
            - Small
  containers:
  - name: with-node-affinity
    image: registry.k8s.io/pause:2.0
Taints /Tolerations and Node Affinity
Both can be combined to achieve the task - dedicated nodes for specific pods.
We first use Taints/Tolerations to prevent other pods from being placed on Nodes but this does not guarantee always so second you can use Node Affinity to prevent pods from being placed on the nodes.
Resource Limits
By default, Kuberenetes set some resource limits
| Resource | CPU | Memory |
| container within a pod | ||
| (Minimum configuration required) | 0.5 | 256Mi |
| container | ||
| (Limit is set) | 1 | 512Mi |
You can change the default limits in yaml file under the label of the resource for pod usage.
apiVersion: v1
kind: Pod
metadata:
  name: myapp-pod
  labels:
    app: myapp
    type: front-end
spec:
  containers:
  - name: nginx-container
    image: nginx
    ports:
      containerPort: 8080
    resources:
      requests:
        memory: "1Gi"
        cpu: "1"
For more reference, you can go through these links:
https://kubernetes.io/docs/tasks/configure-pod-container/assign-memory-resource/
https://kubernetes.io/docs/tasks/administer-cluster/manage-resources/memory-default-namespace/
https://kubernetes.io/docs/tasks/administer-cluster/manage-resources/cpu-default-namespace/
Daemon Sets
Daemon Sets are like ReplicaSet, deploying multiple instances of a pod. But Daemon Set ensures that one copy of your pod always runs on each node in the cluster.
For more details check my blog: https://hashnode.com/edit/clgxw2zwe000c09mm57ch186l
Static Pods
Kubernetes kubelet can host pods without any help from control plane components and those pods are called static pods. Kubelet also maintains pods, that have the capabilities of auto-healing and auto-scaling.
This concept is useful for deploying control plane components as static pods.
Multi Scheduler
You can create your custom scheduler in the Kubernetes Cluster. While creating a pod you can mention schedulerName in the yaml configuration file.
This we will see in the next blog.
Stay tuned and keep learning :)