Kubernetes- Pods, Replication Controller, ReplicaSet, Deployment, Services, Namespaces
Python backend developer with expertise in DevOps, AWS, and ML.
Create a pod using a YAML-based configuration file
Kubernetes takes YAML file as input for the creation of objects such as Pods, Replicas, Deployment, Services etc.
In YAML configuration file four fields are mandatory :
apiVersion: version of Kubernetes APIs you are using to create the objects.
kind: It refers to the kind of object we are trying to create.
metadata: Stores the information about the object like name, labels, namespace etc. metadata has specific keys which you can't change or add according to your wish but under labels dictionary key, you can have any kind of key or value pairs as you wish.
spec: This is a specification section and this is going to be different for different objects. It is a dictionary.
Let's create a yaml file for pod creation. pod-creation.yaml
apiVersion: v1
kind: Pod
metadata:
  name: myapp-pod
  labels:
    app: myapp
    type: front-end
spec:
  containers:
    - name: nginx-container
      image: nginx
To create a pod using pod-creation.yaml file, run the command using kubectl
kubectl create -f pod-creation.yaml
To see the pod with other information:
kubectl get pods

kubectl describe pod myapp-pod
This is so simple, you just deployed your first app on the Kubernetes cluster using yaml configuration file.
Replication Controller
Suppose we have one application running in one pod. If due to some reason application crashes and the pod fails then the user also lost access to the application. So to prevent the user from losing access to our application, we would like to have more than one instance of our application. That way even if one fails we have our application running and users won't lose access. The replication controller helps us run multiple instances of a single pod in the Kubernetes Cluster, thus providing high availability and also helps us balance the load across multiple pods on different nodes.
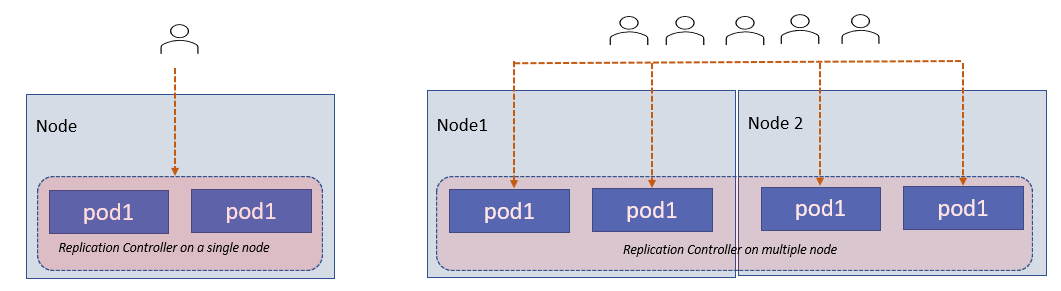
While creating the ReplicationController yaml file, in the specification we need to define the template for the pod and specify the number of replicas to run under the replicas label.
Now let's create a yaml for the replication controller object: rc-creation.yaml
apiVersion: v1
kind: ReplicationController
metadata:
  name: myapp-rc
  labels:
    app: myapp-rc
    type: front-end
spec:
  template:
    metadata:
      name: myapp-pod
      labels:
        app: myapp
        type: front-end
    spec:
      containers:
        - name: nginx-container
          image: nginx
  replicas: 4
# To create pods using replication controller object
kubectl create -f rc-creation.yaml

# To see the replication controller object
kubectl get replicationcontroller

# To see the pods created by the replication controller
kubectl get pods
ReplicaSet
ReplicaSet is used to monitor your pods and to ensure that number of replicas must run at all times to maintain the desired number of pods. If those pods are not created then it will create for you. If the pods are already created then to know which all pods to monitor, replicaset use selector label. So under the selector label, we use the matchLabels filter and provide the same label that is used while creating the pods. This way ReplicaSet knows which pods to monitor.
ReplicaSet is very much similar to ReplicationController but ReplicaSet requires a selector definition that identifies what pods are under it for monitor. So in ReplicaSet, the selector section is mandatory.
Let's create a ReplicaSet yaml file: rs-creation.yaml
apiVersion: apps/v1
kind: ReplicaSet
metadata:
  name: myapp-rs
  labels:
    app: myapp-rs
    type: front-end
spec:
  template:
    metadata:
      name: myapp-pod
      labels:
        app: myapp
        type: front-end
    spec:
      containers:
        - name: nginx-container
          image: nginx
  replicas: 4
  selector:
    matchLabels:
      type: front-end
Kubectl command:
# to create pods using ReplicaSet Object
kubectl create -f rs-creation.yaml

# To see replicaset object
kubectl get replicaset
kubectl describe replicaset myapp-rs

# To get pods created by replicaset
kubectl get pods
Scale ReplicaSet
Suppose we started with 4 replicas and now we need to scale to 10.
- One way is to update the yaml file of replicaset.
Change the replicas value to 10 and then run the kubectl replace command.
kubectl replace -f rs-creation.yaml
- The second way is to run the kubectl scale command:
kubectl scale --replicas=10 -f rs-creation.yaml

# or another way of writing "kubectl scale --replica=10 replicaset <replicaset name as provided in metadata>"
kubectl scale --replica=10 replicaset myapp-rs
Note: Scaling using the file name as input will not automatically update the number of replicas in the file. Although it will scale but the file will not get updated.
- The third way is to scale automatically based on load.
Deployment
Suppose you deployed your application in the production environment with multiple instances. Now you want t upgrade your application, you will upgrade them one after the other. This upgrade mechanism is called rolling updates.
Deployment provides you the capabilities to upgrade your applications smoothly using rolling updates, undo changes, pause, and resume changes as required.
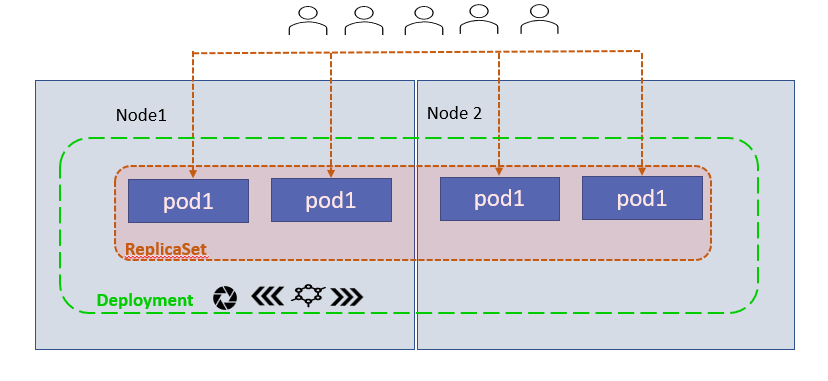
Let's deploy your front-end application using a deployment object. Its yaml file is very much similar to replicaset's yaml file. The deployment automatically creates a replicaset object.
deployment.yaml
apiVersion: apps/v1
kind: Deployment
metadata:
  name: myapp-deployment
  labels:
    app: myapp-deployment
    type: front-end
spec:
  template:
    metadata:
      name: myapp-pod
      labels:
        app: myapp
        type: front-end
    spec:
      containers:
        - name: nginx-container
          image: nginx
  replicas: 4
  selector:
    matchLabels:
      type: front-end
Kubectl commands to deploy your application using deployment.yaml file.
# To deploy your application using deployment.yaml file: it will create deployment object and a replicset object.
kubectl create -f deployment.yaml

# To see the created deployements object
kubectl get deployments

# To see the created replicaset object
kubectl get replicaset

# To see the created pods
kubectl get pods

# To see all the created object at once
kubectl get all
Services
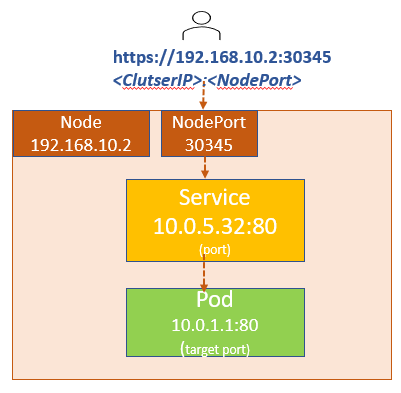
Kubernetes Services enable communication between various applications within and outside the cluster.
Various types of Services :
ClusterIP: The service creates a virtual IP inside the cluster to enable communication between different applications.
NodePort: The service maps a port on a node to a port on the pod. This enables communication from outside the cluster. We can say it helps us in making an external facing application available on the port.
NodePort valid in the range(30,000 to 32,767)
LoadBalancer: Cloud providers provide provisions for a load balancer for our applications.
ExternalName: DNS name is used to access the applications from outside the cluster.
Now let's create a Service of NodePort type: service.yaml
apiVersion: v1
kind: Service
metadata:
  name: myapp-service
spec:
  type: NodePort
# in ports section only port is mandatory
  ports:
    - targetPort: 80
      port: 80
      nodePort: 30345
# It must be from pod definition metadata's label section
  selector:
    app: myapp
    type: front-end
# create the service
kubectl create -f service.yaml

# see the created service
kubectl get services
# or
kubectl get sv

# Now we can you this port to access the application
curl http://192.168.10.2:30345
Now let's see ClusterIP Service which provides communication within the cluster. Suppose we have 3-tier architecture, front-end, backend, and database. To make communication smooth we will create 3 services for each service type. Each service gets an IP name assigned to it inside the cluster, that IP will be used by other applications for communication. This enables the deployment of microservices-based applications on the Kubernetes cluster effectively and easily.
apiVersion: v1
kind: Service
metadata:
  name: db-service
spec:
  type: ClusterIP
  ports:
    - targetPort: 80
      port: 80
  selector:
    app: myapp
    type: db-server
# create the service
kubectl create -f service.yaml

# see the created service
kubectl get services
# or
kubectl get svc
Namespaces
In Kubernetes, Namespaces provide logical isolation of resources. Names of resources need to be unique with that namespace cluster but not across namespaces. Namespace scope is applicable only for namespaced objects (Deployments, Services etc) and not for the cluster-wide objects (StorageClass, Nodes, PersistentVolumes etc)
Initial Namespaces: Kubernetes starts with 4 initial namespaces
default
It's a default namespace, so anything you create without specifying any namespace will come to this default namespace.
kube-node-lease
kube-public
kube-system
If you do not want to specify the namespace in the command line then you can specify in the yaml configuration file in metadata section, labeled namespace
apiVersion: v1
kind: Pod
metadata:
  name: myapp-pod
  namespace: dev
  labels:
    app: myapp
    type: front-end
spec:
  containers:
    - name: nginx-container
      image: nginx
How to create a namespace in the Kubernetes cluster:
Using kubectl command:
# list the current namespaces in the cluster
kubectl get namespaces

# Set the namespace for a request
kubectl run nginx --image=nginx --namespace=<enetr_your_namespace_name>
kubectl get pods --namespace=<enter_namespace_name>
Create a namespace using yaml file: namespace-dev.yaml
apiVersion: v1
kind: Namespace
metadata:
  name: dev
# Now create a namespace using a yaml file
kubectl create -f namespace-dev.yaml

# Directly create a namespace
kubectl create namespace dev

# get pods specific to dev namespace
kubectl get pods --namespace=dev

# To list all the namespaces
kubectl get pods --all-namespaces
How to switch to a custom namespace by default instead of the default namespace. Then set in kubectl config
kubectl config set-context $(kubectl config current-context) --namespace=dev
Resource Quota
To limit the resources in the namespaces we will use Resource Quota.
Let's create a cpu-quota.yaml file
apiVersion: v1
kind: ResourceQuota
metadata:
  name: cpu-quota
  namespace: dev
sepc:
  hard:
    pods: "10"
    requests.cpu: "4"
    requests.memory: 5Gi
    limits.cpu: "10"
    limits.memory: 10Gi
Daemon Set
Daemon Sets are like ReplicaSet, deploying multiple instances of a pod. But Daemon Set ensures that one copy of your pod always runs on each node in the cluster.
Generally used for deploying Monitoring Agent or Logs Collector Agents on each node for monitoring and collecting logs. The second use case is kube-proxy and Weave-net which is present on every node for networking in the cluster.
Let's host log-collector-agent on every node in the cluster using the Daemon Set configuration file: daemonset.yaml
apiVersion: apps/v1
kind: DaemonSet
metadata:
  name: logs-collector-daemon
spec:
  template:
    metadata:
      name: myapp-pod
      labels:
        app: myapp
        type: log-collector
    spec:
      containers:
      - name: log-collector-agent
        image: log-collector-agent
  selector:
    matchLabels:
      app: log-collector-agent
Create a DaemonSet using Yaml file
kubectl create -f daemonset.yaml

# to view daemonsets
kubectl get daemonsets

# to view more details
kubectl describe daemonsets logs-collector-daemon
Note: Daemon pods are ignored by the kube-scheduler and the kube-scheduler has no effect on these pods.
Some Useful Commands to Know:
###################### RELATED TO REPLICASET OBJECT #####################

# To know more about replicaset
kubectl explain replicaset

# To create replicaset object
kubectl create -f <relpicaset-object-creation.yaml>

# To edit the replicaset yaml file: kubectl edit replicaset <replica_set_name>
kubectl edit replicaset myapp-rs
# or
kubectl edit rs <replicaset_name>

# To see created replicaset object
kubectl get replicaset
# or
kubectl get rs

# To delete replicaset object - it will also delete all underlying pods.
kubectl delete replicaset <replicaset_name>

# To update the replicaset in the file
kubectl replace -f <replicaset_object.yaml>

# Scale replicaset without modifying the file
kubectl scale -f <replicaset_object.yaml>

# or
kubectl scale rs <replicaset_name> --replicaset=<new number>


############################## kubectl run commands ######################

# Create an NGINX Pod
kubectl run nginx --image=nginx

# Generate POD YAML file
kubectl run nginx --image=nginx --dry-run=client -o yaml > pod.yaml

# use help command for creating deployment
kubectl create deployment --help

# Create a deployment and save it to a file.
kubectl create deployment --image=nginx nginx

# To see the create deployment
kubectl get deploy

# Generate Deployment YAML file and save it to a file.
kubectl create deployment --image=nginx nginx --dry-run=client -o yaml > nginx-deployment.yaml

# Modify the file and then create the deployment.
kubectl create -f nginx-deployment.yaml

#in k8s version 1.19+, we can specify the –replicas option
kubectl create deployment --image=nginx nginx --replicas=4 --dry-run=client -o yaml > nginx-deployment.yaml
Keep learning :)